Monday, May 28, 2012

Bracelets - Memory Wire

I used to wear bracelets and watches all the time but since I had my kids and gained weight I just can't seem to find any that fit me. I packed all my old bracelets and watches away in my jewelry box saving them for maybe a time when they will once fit me again. Hopefully soon rather than later.

In the mean time I found out about this stuff called memory wire. I've seen it in the craft stores, looked at the package, wondered what the heck it was and left it there. As it turns out I came into a large lot of jewelry stuff that I was looking at making bookmarks and such with. There was a ton of this stuff coiled up in there. I figured I start playing around to see what I could do and learn about it.

So what is memory wire? Well it turns out that it is a stainless steel wire that comes in coils that holds it's shape really well. You can uncoil it enough to get it around your wrist. I take it and basically wind it onto or off of my wrist. It's great! It's light weight and hold against your skin assuming that your not tiny. The wire is hypoallergenic and rust, fade and discoloration resistant. There's no reason to worry about what size a bracelet is and if it will fit. Because, lets face it, there's nothing worse than finding a bracelet you love and it doesn't fit or you don't have a darn clue what size you would need. (I've been there and disappointed in the end.) To top it off there is no clasps. That's right, no fumbling around trying to get the clasp hooked or finding someone kind enough to hook it for you. All you have to do is just wind or wrap the bracelet on to your wrist and off. Easy peasy!

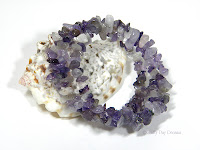
With all the beads I now had from the lot as well as all the memory wire I started making bracelets. I started out making them for people, my kids and friends. Here's the first few I made:

Then I got to thinking that I can't possibly be the only person in the world who has these sorts of problems with bracelets. So I started making more and more and now I'm slowly adding them to my shop. I've made some with gem stones like amethyst, sodalite, and citrine. Click on them to check them out.


I have also made some with glass,metal and shell beads:

Sunday, May 20, 2012

My Garden Box Garden

I'm so proud. I worked extra hard on the garden this year to get it where it is. It's not quite where I'd like to see it but it's close. :)

I started out this year planning out the expansion of the garden and figuring out just how many more boxes we would need. Now if you've never gardened in a box you have got to try it. I was a long time ground planter, since I was little. We would till up part of my parents back yard every year and plant our plants directly in the ground, what I call a ground planter. Since I've discovered boxes I can't get away from them. I absoultly love them. It's so much easier than ground planting.

It all starts off with your box. You can really use anything, at least I do. I have some pallets that I've recycled into boxes and some plain pallets out there as well. I have two the I have left all the pallet boards in and just laid them down so that the side with the least amount of boards shows, this gives you more growing space and is fine for planting things that have smaller, shallower root systems. I planted lettuce in one and herbs in the other. Most of my boxes are made from upcycled wood pieces from house construction left overs and even some boards from an old waterbed. This year we were out of long feesible wood to upcycle so I had to come up with and economical - (in other words cheap)- way to build some new boxes.

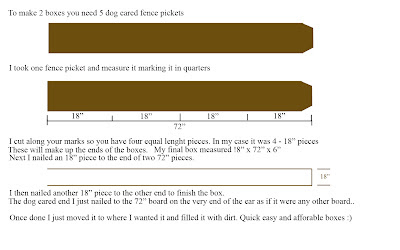
I did this using dog eared cedar fence pickets. They worked out really well and are only about $1.50 - $2 a picket. I made four boxes for about $17-20 not including the soil. I bought 10 - 72" fence pickets. You need 5 pickets to make 2 boxes. This is how I did it:

These boxes make my gardening life so much easier. To get ready this year I added compost to the previous years boxes and turned them, mixing the compost into the soil...easy peasy! And the best part is no fighting with the tilling and the rocks in the ground. Now sure it's not easy the first year or when you expand, I remove all the grass before I put boxes down, but after the first year you'll love it. I also find that my plants grow much better in boxes. I probably should have leveled out the ground but I didn't really bother with that as long as there wasn't a significant gap between the ground and the box. This years boxes I filled with a mix of top soil and garden soil in a 2:1 ratio.
Here's what it looks like so far this year:


The wheelbarrow idea I saw on Pinterest and I had an old one that was just rotting away out by the garden so I figured I'd give it a go. Hopefully the flowers in there fill out more. You can see our rain barrel, the green round thing, and some buckets and totes that I used for moving things around. In the front of the garden is some squash, garlic (planted in the ground...well it just came up from no where so I left it), chives, parsley and a strawberry plant. In the back where the lattice is there are peas and where the wire cages are is tomatoes. Eventually basil will be planted in there for some companion gardening. Then there is a box for cucumbers, one for mint, tarragon, celantro, rosemary, and dill. A box for leeks (which survived the winter), parsnips, and carrots. Another for beans, onions and spinach. A box for more beans and eggplant. One whole box for peppers, and another whole box for lettuce. Then where there are no boxes I am yet again attempting to grow corn, yellow corn and strawberry popcorn corn. I have yet to have luck with corn, keeping my fingers crossed that this will be different this year.
So there's my garden. It's taken me a good weeks worth of work to get it all set up and mostly planted. I have a few seedlings that are still to small to be planted and some didn't make it. So I will like be planting those next weekend and eventually buying plants to replace the one's I lost. I'll try to keep you up to date on how things are going so you can see just how wonderful things are in boxes.
Friday, May 11, 2012

Mini Leather Books

I recently came across a few suede leather scraps and figured I'd give a go at making a book with the scraps. I got both purple (my favorite color) and tan leather that is so soft. I thought they would make lovely books. The scraps, however, are just that scraps. They are not very big at all. I typically save any of my cuts from other books I've made in the past for just such occasions where I want to make a little book. The cuts work out perfectly for littler books. I trim down the scrap cuts to the size I will need to make my book, fold them in half, and make signatures out of them. Typically on my smaller books I like to stick with four sheets per signature because the sketch paper tends to be so thick that anymore just wouldn't work. Once I have all the signatures made I look at and played with different ways of wrapping the leather around them to help me determine where on the leather they would get sewn. After making up my mind with where I think they should go I selected my thread and started long stitching them into the leather. This was way easier said than done. I figured nice soft leather, nice long sharp book binding needle shouldn't be a problem...boy was I wrong. That nice soft leather is a pain in the rear to try to get a needle though. I had to position my needle where I wanted it and then us the table top to help force the needle though the leather. I think that after this I just might need to invest in some leather working needles, or at least some stronger needles. The book binding needles tend to break at the eye if there's to much force or pull on them. I've broken a few in the past experimenting with stab bound books. I do have to say that I love the way they turned out. I added some colored jump rings to the spines to turn them into necklaces / key chains. You'll definitely be seeing more little leather books and possibly some big ones (if I can find somewhere to get big leather) in the future. :D

Here's the two that I made: Brown Leather & Purple Leather