This past weekend was the Heirloom Rubber Stamp and Paper Art Show. I wanted to go but was worried about bringing the kids to this show. I knew in my mind what I was setting myself up for; "I'm bored" and "How much longer?" I could see it already. My hubby said that we would just give it a try and see just how things went.
We have never been to a rubber stamp or paper art show so we didn't really know what to expect. I have to say we were pleasantly surprised. We spent just over two hours there. There was so much to see and do that it kept the kids occupied. I think they did every make and take there was. They had a blast. Thank God they're crafty kids.
My youngest is a touchy kid so the make and takes were a great way for her to have her hands busy and involved. The oldest gets tired and cranky fast but we had none of that until the ride home. I was so impressed on how good they were and by what they made. It just made me beam with happiness. :)
The first stop was the roughest. We stopped by Endless Creations and Everyday Cards. The lady at the booth was a saint. She worked with the kids to explain how to use the different stamps and the basic how to's of card making. My youngest got frustrated right of the bat because the words she stamped in her flags were not straight. Needless to say it took a lot of talk from my hubby to convince her to go on and that every card is different. I have to say the cards came out so neat.
After this we sent them off on their own with money to do the make and takes. Their next stop was at Local King Rubber Stamp. There they tried out some marker on stamp techniques. I have to say they did a good job.
Next they headed to Stamp on It where they used some 3D crystal lacquer, glitter and foil stickers to make a card. These came out amazing. I loved how the 3D crystal lacquer and glitter work so much so that I picked up some acetate and a kit that they had with the lacquer in it.
Somewhere along the line they found a place to try out the Winks of Stella.
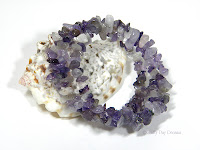
Lastly it was off to Craft Fantastic where the girls each made two necklaces.
They did all this while we shopped and walked around spying some great tags, cards and demos.
Here is two amazing demos from Impression Obsessions both on the Pan Pastels. These are a must get!
Showing posts with label Jewelry. Show all posts
Tuesday, June 9, 2015
Wednesday, January 15, 2014
Booklaces
What is a booklace?
Well simply it's a book necklace. It is also far more than that......
These have started making an appearance in my stores and I wanted to share just exactly what they are. They were designed to be a fun and fashionable way to always have paper with you to take notes, jot down lists or simply pass off a note or number to someone else. They are all handmade and unique.
Lets start off by talking about the chains. The chains are long to extra long in length. The lengths of the chains vary but the average is 32"- 36" long. I wanted something that if I'm heading out the door I can just slip on and not have to fuss with clasps and what not. Some chains will still come with clasps but should not have to be used unless you want to. These should easily slip over your head and will come in a wide variety to match the books that come with them. Each end of the chain will have a ring that simply slides on to the binder rings of the book to attach the book to the chain.
Moving on to the books. The books measure 2" wide by 2.5" tall. The start off with book board and a selected cover paper. As with all my books a pH neutral PVA book binders glue is used. The covers of the book are punched and fitted with eyelets to help prevent any wear from the rings. The book just grow from there based on my inspirations. There will be some steampunk and tons of floral. I bought a ton of gorgeous Prima Marketing embellishments and flower so those will definitely be seen on books. You'll just have to keep checking to see the new ones that appear.
The paper inside - To start the booklaces come with 50 plain white pages of 28 lb paper, heavier than you standard printer paper. If you don't want the plain, 50 sheets of standard lined paper can be put in instead simply by making a note and letting me know at check out. Other options might develop such as colored paper, which I have a ton of so just ask if you are looking for some, along the way.
Pencils. Well with every notebook a writing utensil is needed or how else would you write in it. Instead of fumbling for a pen or pencil in your bag, purse or pocket the pencil is chained to the necklace. No worries about forgetting it or losing it. The pencils are attached to the chain via a swivel clasp. The swivel allows for the pencil to be used with out the chain tangling up. The clasp allows you to remove the pencil and place it on the dominate side of the chain or just take it off completely. You might even prefer it attached to something else, maybe a key chain or zipper or something entirely different the option is yours. These will also be available separately so if you need a replacement, mix and match or just want the pencil, they will be there. ***NOTE: Because these pencils are hand wrapped with a matching paper then sealed the best way to sharpen them is with a knife or razor.***
The over all book itself....It's unique feature is that it is total replaceable, interchangeable and customizable. Simply open the binder rings and a whole other world awaits. The chains are the first to come off, simply slide the rings of the chains off and slide another one on. Next take a cover off or both covers off. You need to take one off to replace the paper but if you want you can mix and match your covers. One the cover is off switch out the old paper for the new, replace the cover, the chain and close the binder rings. All parts are replaceable and interchangeable so have fun and be sure to check out ArtFire or Etsy for your booklaces.
![]() |
![]() |
Wednesday, January 1, 2014
Lots of New This New Year!!
Second; I want to wish everyone a very happy and healthy new year. I decided not to partake in the New Year's resolutions this year for a few reasons, the biggest one being that I normal do not succeed very well at them. I have decided to take on some goals for myself instead. One of these goals is to try to blog more and show maybe more in progress stuff. I'd like to maybe do some videos too. Second goal is to get everything that I have made photographed and listed in my stores. Surprisingly I have a ton of items made that I just have not found the time to photograph and list.
Third; Be on the look out for some great new items coming your way this new year. There will be a wide variety of new items appearing in my stores. Booklaces will be making a appearance after a some good feedback from the lucky person to receive the prototype. Adjustments have been made and the original improved upon. Start looking for these in the up and coming weeks. Be sure to keep checking back to see what's been added to the store. :)
Wednesday, June 6, 2012
Gaming
When I was younger and even still gaming is part of my life. I can still remember my father bringing home a apple computer from work. I would sit and play Zork on it for what felt like hours. Back when you had to read the game and type what you wanted to do. (Oh dear, I'm dating myself!) I remember playing Atari and Intellivision, loving Frogger, Pit Fall and Burger Time. Then came the Nintendo and Dragon Quest and Bubble Bauble, which I'd play for hours. And of course the many following versions of the Nintendo and Playstations. Now I'm more into the social MMO games, World of Warcraft mainly. But there were also the non-computer games. There was Dungeons and Dragons when I was in high school. I have some great memories of sitting around with friends rolling dice and playing the game. I also played some live action Vampire: The Masquerade, which was tons of fun. There were also the card games. I vaguely remember when Magic the Gathering came out. I started collecting the cards when they were in the revised edition. I never really played till I met my husband. He was a big MTG play so we've played a little bit together. I still find it somewhat confusing, but that's just me.
Digging around the house recently I came across some "retired" D&D dice. I say retired because, well it's been years since anyone here has played. I thought they were rather neat looking dice. I love the colors and patterns on them. I would hate to just have to throw them out. I had to find a way to give the dice new life. Way back...who knows when...I played around with chainmail. I made my own jump rings and would make bracelets and necklaces. I still have a few somewhere, I'll have to dig them up sometime. But any who, I figured I'd turn these dice into necklaces by encasing them in chainmail. Actually I didn't arrive at the chainmail idea that fast, I fist tried wire wrapping them and it works sort of they they would come out of the wrapping easily and well it was a nightmare. So that's when I decided on the chainmail. Here are four that I've done so far, you can also see them HERE for more information:
Beside the dice my hubby gave me a wonderful idea. It's something we have been thinking of doing for awhile but never really got around to it. We wanted to create unique creature tokens for card games such as Magic the Gathering or World of Warcraft's trading card game. Our first thought was to make actual cards, but then the idea hit one day to make glass bauble token creatures. I ended up making up a bunch and sold a few sets of them on e-bay and I finally decided to add them to my ArtFire store as well. They are glass baubles, for lack of a better descriptive word, with images and felt lined. I felt lined them to help keep them from sliding around the table during play. There are smaller guys which I have made in sets of 20 to be used as creature tokens or life counters, and there are larger tokens for the bigger badder creatures. Here a few pictures of some of the sets that I made or you can CLICK HERE to check them all out:
Digging around the house recently I came across some "retired" D&D dice. I say retired because, well it's been years since anyone here has played. I thought they were rather neat looking dice. I love the colors and patterns on them. I would hate to just have to throw them out. I had to find a way to give the dice new life. Way back...who knows when...I played around with chainmail. I made my own jump rings and would make bracelets and necklaces. I still have a few somewhere, I'll have to dig them up sometime. But any who, I figured I'd turn these dice into necklaces by encasing them in chainmail. Actually I didn't arrive at the chainmail idea that fast, I fist tried wire wrapping them and it works sort of they they would come out of the wrapping easily and well it was a nightmare. So that's when I decided on the chainmail. Here are four that I've done so far, you can also see them HERE for more information:
|
|
|
![]() |
![]() |
![]() |
![]() |
Monday, May 28, 2012
Bracelets - Memory Wire
I used to wear bracelets and watches all the time but since I had my kids and gained weight I just can't seem to find any that fit me. I packed all my old bracelets and watches away in my jewelry box saving them for maybe a time when they will once fit me again. Hopefully soon rather than later.
In the mean time I found out about this stuff called memory wire. I've seen it in the craft stores, looked at the package, wondered what the heck it was and left it there. As it turns out I came into a large lot of jewelry stuff that I was looking at making bookmarks and such with. There was a ton of this stuff coiled up in there. I figured I start playing around to see what I could do and learn about it.
So what is memory wire? Well it turns out that it is a stainless steel wire that comes in coils that holds it's shape really well. You can uncoil it enough to get it around your wrist. I take it and basically wind it onto or off of my wrist. It's great! It's light weight and hold against your skin assuming that your not tiny. The wire is hypoallergenic and rust, fade and discoloration resistant. There's no reason to worry about what size a bracelet is and if it will fit. Because, lets face it, there's nothing worse than finding a bracelet you love and it doesn't fit or you don't have a darn clue what size you would need. (I've been there and disappointed in the end.) To top it off there is no clasps. That's right, no fumbling around trying to get the clasp hooked or finding someone kind enough to hook it for you. All you have to do is just wind or wrap the bracelet on to your wrist and off. Easy peasy!
With all the beads I now had from the lot as well as all the memory wire I started making bracelets. I started out making them for people, my kids and friends. Here's the first few I made:
Then I got to thinking that I can't possibly be the only person in the world who has these sorts of problems with bracelets. So I started making more and more and now I'm slowly adding them to my shop.
I've made some with gem stones like amethyst, sodalite, and citrine. Click on them to check them out.
I have also made some with glass,metal and shell beads:
In the mean time I found out about this stuff called memory wire. I've seen it in the craft stores, looked at the package, wondered what the heck it was and left it there. As it turns out I came into a large lot of jewelry stuff that I was looking at making bookmarks and such with. There was a ton of this stuff coiled up in there. I figured I start playing around to see what I could do and learn about it.
So what is memory wire? Well it turns out that it is a stainless steel wire that comes in coils that holds it's shape really well. You can uncoil it enough to get it around your wrist. I take it and basically wind it onto or off of my wrist. It's great! It's light weight and hold against your skin assuming that your not tiny. The wire is hypoallergenic and rust, fade and discoloration resistant. There's no reason to worry about what size a bracelet is and if it will fit. Because, lets face it, there's nothing worse than finding a bracelet you love and it doesn't fit or you don't have a darn clue what size you would need. (I've been there and disappointed in the end.) To top it off there is no clasps. That's right, no fumbling around trying to get the clasp hooked or finding someone kind enough to hook it for you. All you have to do is just wind or wrap the bracelet on to your wrist and off. Easy peasy!
With all the beads I now had from the lot as well as all the memory wire I started making bracelets. I started out making them for people, my kids and friends. Here's the first few I made:
![]() |
![]() |
I have also made some with glass,metal and shell beads:
| ![]() |
![]() |
![]() |
![]() |
|
|
|
|
Friday, May 11, 2012
Mini Leather Books
I recently came across a few suede leather scraps and figured I'd give a go at making a book with the scraps. I got both purple (my favorite color) and tan leather that is so soft. I thought they would make lovely books. The scraps, however, are just that scraps. They are not very big at all. I typically save any of my cuts from other books I've made in the past for just such occasions where I want to make a little book. The cuts work out perfectly for littler books. I trim down the scrap cuts to the size I will need to make my book, fold them in half, and make signatures out of them. Typically on my smaller books I like to stick with four sheets per signature because the sketch paper tends to be so thick that anymore just wouldn't work. Once I have all the signatures made I look at and played with different ways of wrapping the leather around them to help me determine where on the leather they would get sewn. After making up my mind with where I think they should go I selected my thread and started long stitching them into the leather. This was way easier said than done. I figured nice soft leather, nice long sharp book binding needle shouldn't be a problem...boy was I wrong. That nice soft leather is a pain in the rear to try to get a needle though. I had to position my needle where I wanted it and then us the table top to help force the needle though the leather. I think that after this I just might need to invest in some leather working needles, or at least some stronger needles. The book binding needles tend to break at the eye if there's to much force or pull on them. I've broken a few in the past experimenting with stab bound books. I do have to say that I love the way they turned out. I added some colored jump rings to the spines to turn them into necklaces / key chains. You'll definitely be seeing more little leather books and possibly some big ones (if I can find somewhere to get big leather) in the future. :D
Here's the two that I made: Brown Leather & Purple Leather
Sunday, April 29, 2012
Rework of Earrings
      I enjoyed a day out with my parent yesterday at Old Mystick Village for their sidewalk sale. We got to see the new ducklings that hatched. Sadly we found out that out of eleven ducklings that hatched there are only six left. Apparently the sea gulls will swoop in and take one of the babies. The remaining six were adorable as heck. I wish I would have had my camera with me so I could post a picture of them. They were still soft and fluffy looking.
      Anyway...I digress...As we were looking around at the items shops had on sale we came a cross some really neat jewelry. My mother really like the earrings but was not happy with the ear wires. She has a problem with hooks falling out even with the little rubber backs. Surprised, I guess it's not an uncommon problem. Unsure about them we walked on down the way. After stopping in and grabbing some drinks from another shop we headed on back up the walk way and back on by those earrings. Mom stopped and looked again. Took took some convincing but she got them after I told her that I could change them up to how ever she would like them.
      I wanted to share with you how I went about transforming the earrings.
Here the earrings are before I did anything to them:
One little snip where the solder was holding the dangle on and I removed the original hooks. (Left is the original hooks, right the dangle separated from the hooks.) You'll notice that one of the cool things about these earrings is that the glass balls come out and are interchangeable. I have removed the balls while I work on them to keep from damaging them or loosing them.
I had to find something that would work for mom. She wanted to keep them as a dangle earring. I showed her some posts that I could put them on or some ear wires with a back that comes up and closes the wire, lever earrings. She decided on the lever earrings. Here are the 14K gold wires with the dangle from the original earrings:
Next I had to get out my gold findings. I thought I'd show you what I store my main gold findings in. I found these nice little stack-able snap containers in the dollar bin at Target and they work perfectly.
I thought about dressing them up for her a little so she could wear the out or just with some everyday clothes. I decided on an AB Swarovski crystal and a gold eye pin that I would just make another loop to connect it with. I decided on the AB crystals because they will pick up and reflect whatever color glass balls she has in the earrings.
I attached the original dangle to one of the eyes of the crystal. I then connected the other eye of the crystal to the new lever ear wires with a gold jump ring so that they would hang so you wouldn't see the connector that goes from the top of the glass ball to the bottom. Here they are all done:
      Anyway...I digress...As we were looking around at the items shops had on sale we came a cross some really neat jewelry. My mother really like the earrings but was not happy with the ear wires. She has a problem with hooks falling out even with the little rubber backs. Surprised, I guess it's not an uncommon problem. Unsure about them we walked on down the way. After stopping in and grabbing some drinks from another shop we headed on back up the walk way and back on by those earrings. Mom stopped and looked again. Took took some convincing but she got them after I told her that I could change them up to how ever she would like them.
      I wanted to share with you how I went about transforming the earrings.
Here the earrings are before I did anything to them:
![]() |
![]() |
One little snip where the solder was holding the dangle on and I removed the original hooks. (Left is the original hooks, right the dangle separated from the hooks.) You'll notice that one of the cool things about these earrings is that the glass balls come out and are interchangeable. I have removed the balls while I work on them to keep from damaging them or loosing them.
![]() |
![]() |
I had to find something that would work for mom. She wanted to keep them as a dangle earring. I showed her some posts that I could put them on or some ear wires with a back that comes up and closes the wire, lever earrings. She decided on the lever earrings. Here are the 14K gold wires with the dangle from the original earrings:
Next I had to get out my gold findings. I thought I'd show you what I store my main gold findings in. I found these nice little stack-able snap containers in the dollar bin at Target and they work perfectly.
I thought about dressing them up for her a little so she could wear the out or just with some everyday clothes. I decided on an AB Swarovski crystal and a gold eye pin that I would just make another loop to connect it with. I decided on the AB crystals because they will pick up and reflect whatever color glass balls she has in the earrings.
I attached the original dangle to one of the eyes of the crystal. I then connected the other eye of the crystal to the new lever ear wires with a gold jump ring so that they would hang so you wouldn't see the connector that goes from the top of the glass ball to the bottom. Here they are all done:
Subscribe to:
Posts (Atom)


