I missed opening day of the farmers market this year :( but I did make it this past weekend. There was so much to see and it was great seeing lots of the same vendors from the previous years.
I love this time of year and having fresh veggies all the time. We picked up our first week of the CSA we ordered for this year. It's from the same farm as last year, their produce is so good. This week we got peas, kale (I think I will try making kale chips), two yellow squash, a zucchini, a head of lettuce, and a fresh garlic. I hope to can a lot more this year than I did last year. I don't think I'll be as uneasy, afraid or leary of doing it. It's definitely not as hard as I ever imagined it would be and what I canned last year almost allowed us to go though to this season. Now that I sort of know what I'm doing it will be easier.
The farmers market is not all veggies and meats though. There are plenty of artisans and crafters there. There was one booth that I stopped by and picked up a few ceramic charms pieces and buttons that I'm hoping to incorporate into something I make. I have a few ideas already floating around.
There was only one disappointing thing, but it's a major thing. It's something that every vendor should be aware of. When I got home and opened my bag from the vendor with the buttons and charms there was nothing else in there. Just what I bought. (I know you're probably thinking that I shouldn't expect anything else in there and wondering what else should be in there.)But I have no way of knowing who made the buttons or who I bought them from. I've seen them set up there before and I know they have a business, but now I have no way to know how to contact them if I want more. I am very disappointed by this. If these buttons work how I imagine or the charms look lovely with what I plan on doing with them I would want more but I have no way of getting any. :(
Vendors, sellers, artisans, anyone who sells anything....PLEASE, PLEASE, Please, make sure something goes home with your customers that has your business name on it at the very least. A business card, receipt/stamp on the bag with your name and contact info, or where to buy on-line...anything with a way for your customer to get more if they like your stuff.
Showing posts with label food. Show all posts
Showing posts with label food. Show all posts
Monday, June 18, 2012
Friday, June 15, 2012
Garden Flowers
The garden is finally in full swing. Some crops are doing better than other. Spinach, onions and eggplant just are not going to be happening this year. I think all of 4 spinach plants are there and getting eaten by bugs and I have 2 onions growing. The rest of the garden seems to be doing good.
I was out weeding around the corn today, I couldn't tell were the corn ended and weeds began, and I noticed all these lovely flowers. I don't think people realize just how lovely vegetable and fruit flowers in the garden can be. I decided to take some pictures of my lovely garden flowers.
First up is my strawberry plant. I bought this as a plant from the plant clearance rack at Lowes. Let me tell you this was the saddest little plant I had ever seen. I wasn't even sure if the plant would live. It was only fifty cents so I figured I'd give it a chance. Now look at it. It grew a shoot and formed another plant so now I have two plants and it's got this love pink flower on the top. Not bad for fifty cents.
While weeding I was scanning the garden and noticed something that seemed odd to me, a color that I have not seen on anything other than eggplant flowers, purple. Now my eggplant isn't flowering so it took me a second to think about what exactly had the purple flower, it's my heirloom beans. I've never seen bean plants with purple flowers before, only white. I thought they were so pretty.
Lastly my peas are taking off. I also got heirloom peas this year. It still amazes me just how tall and how well they grow. I have to go get another piece of trellis for them to climb on. They seem to do so well in the garden. I love the white flowers that they have and trying to hunt to see which ones are going to give way to a yummy pod. Here is six peas in a pod that still have the white flower attached to the bottom:
I was out weeding around the corn today, I couldn't tell were the corn ended and weeds began, and I noticed all these lovely flowers. I don't think people realize just how lovely vegetable and fruit flowers in the garden can be. I decided to take some pictures of my lovely garden flowers.
First up is my strawberry plant. I bought this as a plant from the plant clearance rack at Lowes. Let me tell you this was the saddest little plant I had ever seen. I wasn't even sure if the plant would live. It was only fifty cents so I figured I'd give it a chance. Now look at it. It grew a shoot and formed another plant so now I have two plants and it's got this love pink flower on the top. Not bad for fifty cents.

While weeding I was scanning the garden and noticed something that seemed odd to me, a color that I have not seen on anything other than eggplant flowers, purple. Now my eggplant isn't flowering so it took me a second to think about what exactly had the purple flower, it's my heirloom beans. I've never seen bean plants with purple flowers before, only white. I thought they were so pretty.

Lastly my peas are taking off. I also got heirloom peas this year. It still amazes me just how tall and how well they grow. I have to go get another piece of trellis for them to climb on. They seem to do so well in the garden. I love the white flowers that they have and trying to hunt to see which ones are going to give way to a yummy pod. Here is six peas in a pod that still have the white flower attached to the bottom:

Sunday, May 20, 2012
My Garden Box Garden
I'm so proud. I worked extra hard on the garden this year to get it where it is. It's not quite where I'd like to see it but it's close. :)
I started out this year planning out the expansion of the garden and figuring out just how many more boxes we would need. Now if you've never gardened in a box you have got to try it. I was a long time ground planter, since I was little. We would till up part of my parents back yard every year and plant our plants directly in the ground, what I call a ground planter. Since I've discovered boxes I can't get away from them. I absoultly love them. It's so much easier than ground planting.
It all starts off with your box. You can really use anything, at least I do. I have some pallets that I've recycled into boxes and some plain pallets out there as well. I have two the I have left all the pallet boards in and just laid them down so that the side with the least amount of boards shows, this gives you more growing space and is fine for planting things that have smaller, shallower root systems. I planted lettuce in one and herbs in the other. Most of my boxes are made from upcycled wood pieces from house construction left overs and even some boards from an old waterbed. This year we were out of long feesible wood to upcycle so I had to come up with and economical - (in other words cheap)- way to build some new boxes.
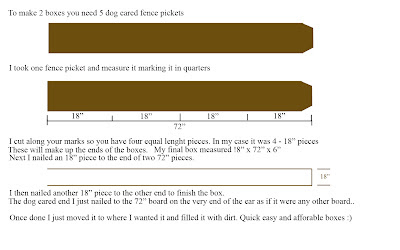
I did this using dog eared cedar fence pickets. They worked out really well and are only about $1.50 - $2 a picket. I made four boxes for about $17-20 not including the soil. I bought 10 - 72" fence pickets. You need 5 pickets to make 2 boxes. This is how I did it:
These boxes make my gardening life so much easier. To get ready this year I added compost to the previous years boxes and turned them, mixing the compost into the soil...easy peasy! And the best part is no fighting with the tilling and the rocks in the ground. Now sure it's not easy the first year or when you expand, I remove all the grass before I put boxes down, but after the first year you'll love it. I also find that my plants grow much better in boxes. I probably should have leveled out the ground but I didn't really bother with that as long as there wasn't a significant gap between the ground and the box. This years boxes I filled with a mix of top soil and garden soil in a 2:1 ratio.
Here's what it looks like so far this year:


The wheelbarrow idea I saw on Pinterest and I had an old one that was just rotting away out by the garden so I figured I'd give it a go. Hopefully the flowers in there fill out more. You can see our rain barrel, the green round thing, and some buckets and totes that I used for moving things around. In the front of the garden is some squash, garlic (planted in the ground...well it just came up from no where so I left it), chives, parsley and a strawberry plant. In the back where the lattice is there are peas and where the wire cages are is tomatoes. Eventually basil will be planted in there for some companion gardening. Then there is a box for cucumbers, one for mint, tarragon, celantro, rosemary, and dill. A box for leeks (which survived the winter), parsnips, and carrots. Another for beans, onions and spinach. A box for more beans and eggplant. One whole box for peppers, and another whole box for lettuce. Then where there are no boxes I am yet again attempting to grow corn, yellow corn and strawberry popcorn corn. I have yet to have luck with corn, keeping my fingers crossed that this will be different this year.
So there's my garden. It's taken me a good weeks worth of work to get it all set up and mostly planted. I have a few seedlings that are still to small to be planted and some didn't make it. So I will like be planting those next weekend and eventually buying plants to replace the one's I lost. I'll try to keep you up to date on how things are going so you can see just how wonderful things are in boxes.
I started out this year planning out the expansion of the garden and figuring out just how many more boxes we would need. Now if you've never gardened in a box you have got to try it. I was a long time ground planter, since I was little. We would till up part of my parents back yard every year and plant our plants directly in the ground, what I call a ground planter. Since I've discovered boxes I can't get away from them. I absoultly love them. It's so much easier than ground planting.
It all starts off with your box. You can really use anything, at least I do. I have some pallets that I've recycled into boxes and some plain pallets out there as well. I have two the I have left all the pallet boards in and just laid them down so that the side with the least amount of boards shows, this gives you more growing space and is fine for planting things that have smaller, shallower root systems. I planted lettuce in one and herbs in the other. Most of my boxes are made from upcycled wood pieces from house construction left overs and even some boards from an old waterbed. This year we were out of long feesible wood to upcycle so I had to come up with and economical - (in other words cheap)- way to build some new boxes.
I did this using dog eared cedar fence pickets. They worked out really well and are only about $1.50 - $2 a picket. I made four boxes for about $17-20 not including the soil. I bought 10 - 72" fence pickets. You need 5 pickets to make 2 boxes. This is how I did it:

These boxes make my gardening life so much easier. To get ready this year I added compost to the previous years boxes and turned them, mixing the compost into the soil...easy peasy! And the best part is no fighting with the tilling and the rocks in the ground. Now sure it's not easy the first year or when you expand, I remove all the grass before I put boxes down, but after the first year you'll love it. I also find that my plants grow much better in boxes. I probably should have leveled out the ground but I didn't really bother with that as long as there wasn't a significant gap between the ground and the box. This years boxes I filled with a mix of top soil and garden soil in a 2:1 ratio.
Here's what it looks like so far this year:

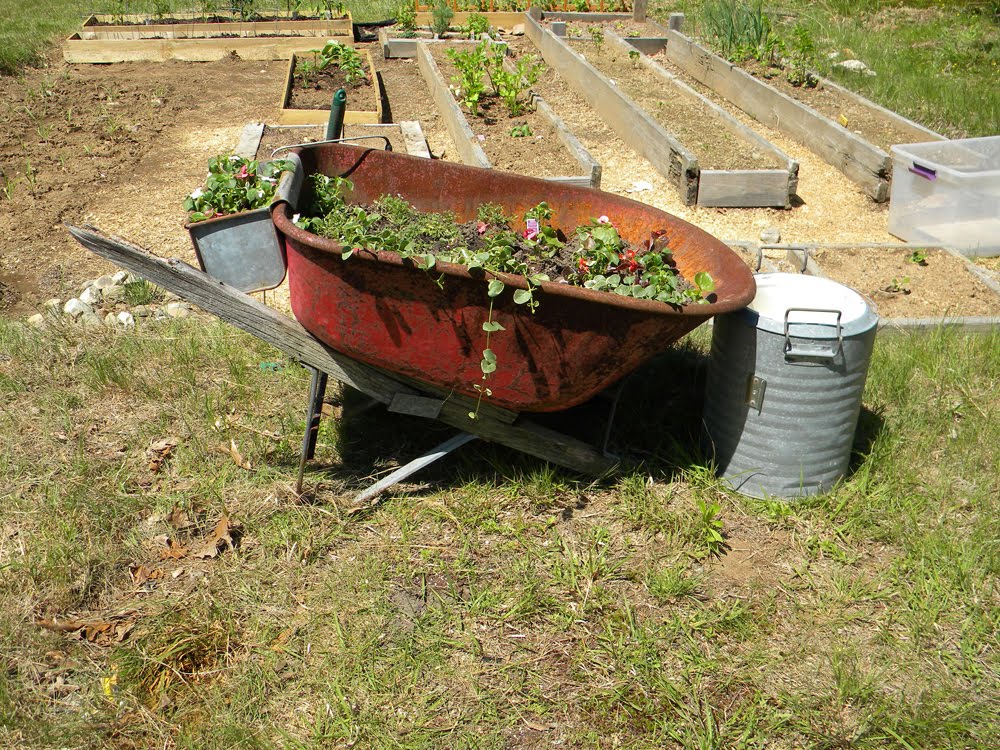

The wheelbarrow idea I saw on Pinterest and I had an old one that was just rotting away out by the garden so I figured I'd give it a go. Hopefully the flowers in there fill out more. You can see our rain barrel, the green round thing, and some buckets and totes that I used for moving things around. In the front of the garden is some squash, garlic (planted in the ground...well it just came up from no where so I left it), chives, parsley and a strawberry plant. In the back where the lattice is there are peas and where the wire cages are is tomatoes. Eventually basil will be planted in there for some companion gardening. Then there is a box for cucumbers, one for mint, tarragon, celantro, rosemary, and dill. A box for leeks (which survived the winter), parsnips, and carrots. Another for beans, onions and spinach. A box for more beans and eggplant. One whole box for peppers, and another whole box for lettuce. Then where there are no boxes I am yet again attempting to grow corn, yellow corn and strawberry popcorn corn. I have yet to have luck with corn, keeping my fingers crossed that this will be different this year.
So there's my garden. It's taken me a good weeks worth of work to get it all set up and mostly planted. I have a few seedlings that are still to small to be planted and some didn't make it. So I will like be planting those next weekend and eventually buying plants to replace the one's I lost. I'll try to keep you up to date on how things are going so you can see just how wonderful things are in boxes.
Wednesday, March 7, 2012
What I've been up to!
I failed at my crafty/creative thing a day resolution...well at least the posting part of it. My deadline got the best of me and I had to work, work, work...color, color, color to get it done. See some of them:

So now that I'm done with that it's back to my regular grind for a little bit. I'm cooking up some really creative ideas for my artist proofs of the line art cards, hopefully some really unique stuff the collectors and other will like to see.
Besides that I've been busy with other things as well. I've come up with a new wonton wrapper recipe. An absolutely delicious dessert one I might add.
 Any ideas what that is in the picture to the left? Hmm...looks yummy no? Well on that wonton wrapper is a spread of nutella and some chopped up strawberries. O.O I know nutella and strawberries...to die for. Well wait till you bake it in a wonton wrapper. Just spread some nutella in the middle, add a couple of chopped up strawberries, lightly wet the edges of the wonton, fold it over, and press it closed. Place them on a cookie sheet sprayed with cooking spray and bake at 350°F for about 5-10 min. You'll know when they are done, trust me I heard sizzling because one of mine popped open. Let them cool! Molten nutella and strawberries will burn your mouth.
 The strawberries in mine melted (I never realized strawberries could melt but they did.) They were so good I made them the next night for the kids for dessert only one kid doesn't like strawberries so I used some chopped up banana and that was amazing too. Reminded me of a warm monkey tail. Yummmm. (Talking about this will probably lead to me making more tonight, they are that addicting.)
What else have I been up to...getting goodies in boxes from Mr. UPS and Mr. FedEx man. :D
 New things to work on some new book ideas and other really cool ideas, some gold shepard's hook bookmarks and some really pretty silver floral and butterfly shepard's hooks. Oh and don't forget the new set of colored pencils. I think I'm in love with my new set of colored pencils.
 These are Cretacolor colored pencils. They are amazing. I loved my Design Spectracolor pencils. (Well okay maybe they are actually hubby's and not mine but I use them more.) I love the feel of the Design when you use them. They're not really hard leaded, they are more on the softer side and they blend well, not really waxy, just great colored pencils. Sad thing is that Design doesn't exist anymore and Specracolor pencils go for a small fortune on e-bay so I've been searching for colored pencils I like just as much. I gave Prismacolor colored pencils a try but they just don't feel the same. Heck you can get 2 Prismacolor pencils in the same color sharpen them and use them side by side and they won't actually be the same color. They also seem to have a much harder lead, at least to me anyway. Hubby came across a deal on Dick Blick for the Cretacolor pencils and we go them dirt cheap. I tried them and I love them. I think I might actually like them more than the Design ones. They are smooth and soft, not really waxy, blend really well, and you can go over them lots of time with no blooming or big waxy build up. They are my new favorite pencil and will eventually replace my Design ones.

So now that I'm done with that it's back to my regular grind for a little bit. I'm cooking up some really creative ideas for my artist proofs of the line art cards, hopefully some really unique stuff the collectors and other will like to see.
Besides that I've been busy with other things as well. I've come up with a new wonton wrapper recipe. An absolutely delicious dessert one I might add.


What else have I been up to...getting goodies in boxes from Mr. UPS and Mr. FedEx man. :D


Tuesday, February 21, 2012
Day 52 - A Day of Food
Today I enlisted the help of the kids to make some cavatelli like my hubby's grandma use to, similar to Nana's video below. Though my pasta dough this time was 2/3 white flour and 1/3 wheat flour.
It took the kids awhile to get the rolling down right but they eventually did. I had them make about a pound of it before hubby and I took the rest of the pasta dough and made ravioli with it. The ravioli was interesting to make. It was my first time making it. I use a mixture of ricotta and seasoning for the filling. I first started off by making a sheet of dough, putting spoons of filling on it and covering it with another sheet of pasta before cutting them. Then I realized it was much easier to make a sheet, place the spoons of filling just off center and fold it over to make half round ravioli. You'll see in my picture some of each and in one of the pictures you can see the bag of cavatelli, my pasta machine, the bowl of filling and misc. goodies. It was a fun experience. We froze all the pasta but 12 ravioli, which we made for dinner. We had them in a brown butter and sage sauce, with a Montreal encrusted fillet....So good.


It took the kids awhile to get the rolling down right but they eventually did. I had them make about a pound of it before hubby and I took the rest of the pasta dough and made ravioli with it. The ravioli was interesting to make. It was my first time making it. I use a mixture of ricotta and seasoning for the filling. I first started off by making a sheet of dough, putting spoons of filling on it and covering it with another sheet of pasta before cutting them. Then I realized it was much easier to make a sheet, place the spoons of filling just off center and fold it over to make half round ravioli. You'll see in my picture some of each and in one of the pictures you can see the bag of cavatelli, my pasta machine, the bowl of filling and misc. goodies. It was a fun experience. We froze all the pasta but 12 ravioli, which we made for dinner. We had them in a brown butter and sage sauce, with a Montreal encrusted fillet....So good.


Monday, February 20, 2012
Days 49,50, & 51 - So far behind
So I haven't had much time for blogging the past few days. It's been absolutely craziness. Non-stop going, and I have still been doing my creative day thing every day even if I didn't post it. I'm going to take today's post to catch back up on everything.
Day 49 - My creative thing for the day was deciding to try to make something else with wonton wrappers. Yep I'm going try to fill them with everything I possibly can. Today was for a late night movie snack with the hubby. We wanted something spicy so..wonton wrapper jalapeno poppers it was. They came out really good, so good I'll be making them again very soon. Here is what I did:
You need: 3 oz of cream cheese
about 5 diced pickled jalapeno rings
1/2 tsp of sour cream
Mix it all together in a small bowl or ramekin till everything is together. I took the cream cheese mix and put about a half a tsp - one tsp in the middle of the wonton wrapper, wet the edges with a little water and folded it into a triangle pressing the edges together. Bake at 350°F for about 10 - 15 minutes until they start to brown.

Day 50 - Today I made a musical ornament. Not musical in the sense that it plays music but musical in the sense that it has to do with music..sheet music. I took a wood ornament painted it, decoupaged on some musical paper, added some musical notes, painted the edge with some gold dust and viola:

Day 51 - Today was all about the kids. I helped the oldest finish up her painting for the art show. Taught her how to make "snow" on the top of the mountains using a white marker. I then framed them and attached some hanging wire to them and took them to the gallery so they could be hung for the kids show. :) I love that my kids like art and I'm proud that their art will be shown in a gallery at such young ages. <3


Saturday, February 11, 2012
Day 42 - Green Key Bookmark
Today I began looking at CSAs. Now I loved our CSA from last year but with the fear of gas prices going up I started looking closer to home. Alas all the ones closer to home are more expensive. It seems that the money we might save by not having to drive as far might be lost by the initial cost of the CSA. Still got a lot of thinking about this to do and not much time to do it in. Most CSA's close at the end of March for sign ups. I better get deciding.
I was singing "Oh crappy day!" (hehe a play on "oh happy day") earlier today as it was gloomy, gray and snowy. So to brighten today up I took some time today some beading and made a little bookmark (or book thong as some people call them...it just makes me laugh. Hehe.) It's a green satin cord with some aurora glass beads and green Swarovski crystals with these cute little silver keys at the ends. :)

I was singing "Oh crappy day!" (hehe a play on "oh happy day") earlier today as it was gloomy, gray and snowy. So to brighten today up I took some time today some beading and made a little bookmark (or book thong as some people call them...it just makes me laugh. Hehe.) It's a green satin cord with some aurora glass beads and green Swarovski crystals with these cute little silver keys at the ends. :)

Friday, February 10, 2012
Day 41 - Taco Cups
So being on this diet not being able to eat the things that I use to, or at least not as much. We are trying to find ways to cut down the amount of points for dinners. Not an easy task. In doing so though I came a cross a little discover on the Weight Watchers facebook page...wonton wrapper. They had this recipe posted for a sort of pierogi made with wonton wrappers. I made those. They were really good. The package of wrappers came with a card with recipes on it for wontons (duh)and ravioli (really?) Looking into it and thinking about it more I figured you could fill wonton wrappers with anything.
So tonight I made taco cups! It was a definite experiment...no recipe to go by. I sprayed my muffin tin with non-stick cooking spray and laid two wonton wrappers cockeyed of one another and gently pressed them down a little bit. I made my taco seasoned meat. Once my taco meat was done I put a spoon full of meat in the center of the wonton wrappers and pushed them down to the bottom of the muffin tin. I then put a small spoon full of re-fried beans on top of the meat and some diced green chillies on top. Topped it all off with a slice of colby jack cheese and baked them in the oven at 350°F for 10-15 min and yummy yum yum. I served with some sweet corn bread and rice. I will definitely be making those again!

So tonight I made taco cups! It was a definite experiment...no recipe to go by. I sprayed my muffin tin with non-stick cooking spray and laid two wonton wrappers cockeyed of one another and gently pressed them down a little bit. I made my taco seasoned meat. Once my taco meat was done I put a spoon full of meat in the center of the wonton wrappers and pushed them down to the bottom of the muffin tin. I then put a small spoon full of re-fried beans on top of the meat and some diced green chillies on top. Topped it all off with a slice of colby jack cheese and baked them in the oven at 350°F for 10-15 min and yummy yum yum. I served with some sweet corn bread and rice. I will definitely be making those again!

Wednesday, February 8, 2012
Day 39 - Update and Valentine Card
I ended up rooting two more green onions, so that now I have four. All of them up on my kitchen window sill. I figured I share with you just how well they are doing. I have to say that I am completely amazed by this. The far right one I just planted yesterday and it has not had a chance to straighten out as it was bent in the glass while rooting.

With Valentine's Day right around the corner I figured I'd post a Valentine card, or an I love you anytime card. :) Those are always nice too. It's made from card stock. There are a couple of heart brads affixed to the paper, a heart candy box that reads love and a tag at the bottom that says i <3 u!


With Valentine's Day right around the corner I figured I'd post a Valentine card, or an I love you anytime card. :) Those are always nice too. It's made from card stock. There are a couple of heart brads affixed to the paper, a heart candy box that reads love and a tag at the bottom that says i <3 u!

Sunday, January 29, 2012
Day 29 - Stamped Terracotta Pot
I planted my green onions today into some little terracotta pots. I hope that they grow okay in them for now until it's nice enough to plant them outside. The terracotta pots are nice because you can do so much with them to dress them up. I took these little pots that I had, some archival waterproof archival ink and a stamp and made a lovely flower pot. I stamped the image on both sides of the pot and put it on a little dish.


Friday, January 27, 2012
Day 27 - Green Onions and What to use on Black Cardstock.
I came across this video thanks to CFRM.
I of course had to check this out and see if this was in fact true. The whole thing seemed kind of weird to me. I'm use to cutting the top off something, ie pineapple, and rooting that or rooting branches, as in having things grow roots not having roots grow things. Could this really be possible?
I am pleased to say that after going out and buying some green onions to use on my nachos the other night that it does in fact work. It kinda creeps the kids out that there's a green thing growing out something that you just chopped off but it is also amazingly cool. I'm thinking that the white part of the green onion is similar to a bulb and thus why this works so well. Check it out:

To do this I cut the white part with the roots off my green onion and put them in a small glass, standing up the best that I could do, with some water in it, and placed it on the window sill. I read some where in the comments on the video to do this to get the roots re-hydrated. A few days later and you have what's seen in the picture. I went out today and got some potting soil and will be potting them this weekend (still to cold to plant outside.) What a way to save some money and grow some great plants both indoors and outdoors. :)
Back to the chalkboard book and the black card stock. I know people are probably wondering...What do I use on the black card stock you made your book out of? Well I have a picture of some of some of the things that I use. At the top of the left hand paper I used a silver gel pen, that didn't work very well and it's tough to see. Under that I used a white Gelly Roll gel pen and that is a nice bright white against the black. Just under that is a ordinary white colored pencil followed by a orange Signo uni-ball pen and another colored pencil, this one yellow. The paper to the left is all colored pencils from both Design and Prismacolor. I would also imagine that pastels would work as well on the black paper but I did not have any handy to try it out.

Wednesday, January 25, 2012
Day 25 - It's starting to come together
OMG! Let me start off by telling you I had the most amazing thing to eat yesterday, and by amazing I mean so not healthy for you. It's called a dirt bomb and I could eat a dozen of them. I got it from a little place in the village called Blue Squid. When I was in there a little dome sat over these things with a label on it that read "Dirt Bomb." Hmmm...curiosity set in and come to find out a "Dirt Bomb" is a doughnut that's been baked in a muffin tin (not to bad right....here comes the not so good for you but wickedly tasty part,) dipped in butter and dredged in cinnamon and sugar. All I can say is AMAZING!!!! I spit one with hubs in the car and immediately wished we would have bought all that were under the glass dome. So if you're ever down in the village (Olde Mystick Village) give up the diet for one day stop by there and grab one of these amazing little things.
Now for today's crafty creative little bit, well it's actually quite a bit. I conditioned the chalkboard paint, works great by the way, and drilled holes in the wood for where it will be bound.


I cut out paper for the pages, I choose a heavy black card stock. I figured I'd go for an artsy sort of book. One for chalk (hence the chalkboard cover,) gel pens, pastels and the like that really pop on black paper. I folded them and they are being pressed right now.

I also covered the inside of the covers of the book with a decorative paper and punched the sewing holes though the paper. Tomorrow hopefully I'll get the pages sewn in. :)

Saturday, January 21, 2012
Day 21 - Snow and Ground Meat
Burrr...It's a cold one out there. The weather says that it's 17°F and feels like 7°F out there. It's been snowing all day today and there is lots of the fluffy white stuff. Personally at this point in the year I was hoping for no snow. I'd rather see the white stuff for Christmas and New Year, not now. I have to say that it does look nice outside with the fresh snow. No brown dirty melty nasty looking snow in site, the plows and sand trucks haven't been by yet. I've only been outside twice to shovel around the cars so the plow guy can plow out the drive, and that was enough work for me. I'm still wondering what happened to the 3-5 inches we were suppose to get, I'd say we got quite a bit more than that.


Seeing how everything that was planned for tonight was canceled due to the weather I spent the day inside. I decided to do something that I've never done before. I ground beef. I bought a meat grinder over the summer to make relish with and thought it would be a waste if that's all I ever use it for. Now I could just as easily go out and buy some ground beef at the store but I got some roasts cheap and decided to grind up 3.5 lbs of meat. It surprisingly wasn't as hard as I thought it was going to be and it didn't take that long. It definitely gave my arm a good work out...it's sore as heck now. I made it into two 1 lb vacuum packed bags and used 1.5 lbs of it for dinner. I made taco meat for nachos with it and it was really good. The texture is a little bit different but it was the best ground meat I've had. There was just enough fat in it too that it created just a little grease in the bottom of the pan. :)


Seeing how everything that was planned for tonight was canceled due to the weather I spent the day inside. I decided to do something that I've never done before. I ground beef. I bought a meat grinder over the summer to make relish with and thought it would be a waste if that's all I ever use it for. Now I could just as easily go out and buy some ground beef at the store but I got some roasts cheap and decided to grind up 3.5 lbs of meat. It surprisingly wasn't as hard as I thought it was going to be and it didn't take that long. It definitely gave my arm a good work out...it's sore as heck now. I made it into two 1 lb vacuum packed bags and used 1.5 lbs of it for dinner. I made taco meat for nachos with it and it was really good. The texture is a little bit different but it was the best ground meat I've had. There was just enough fat in it too that it created just a little grease in the bottom of the pan. :)

Friday, January 13, 2012
Day 13 - The News and A Valentine Tag
Today I found out that a few of my pictures of the CRFM (Coventry Regional Farmers Market) were on the news, and I'm not talking just local news I'm talking national news. The story is on FOX affiliated sites. I was happy to see that they chose my pictures to be part of their story. The farmers market has wonderful subject matter and makes for some great pictures. I just wish that it could have been for a happier story.
The farmers market had some trouble and couldn't come to terms for a new lease with the owners of the site where they held the market. This means that the market needs to find a new home. They have found a perfect spot for the market but the problem seems to be getting the permits needed to hold the market there. The town has been delaying things by continuing the meeting along. Monday will be the third time they will meet about the special permit required for the market. I hope that all goes well and they do get approved. If they don't get approved and the market doesn't have a new home by the last week in January there may not be a market to go to this year. :( Oh and they won this wonderful barn that's suppose to be built this year for them and the new site would allow the barn to be there...going somewhere else might mean no barn. It's all very sad. Many farmers rely on the market and many people, myself included, rely on it to get our fresh local produce, meats, eggs, cheeses, and goodies.
If you want to see the news story about all this and see my photographs you can find it here: Los Angeles Times. The photographs of mine that were used are the one of the produce and the one of Buttercup the calf. Please send some good thoughts and wishes this way for the market.
Now onto today's creative crafty thing, a tag. A tag...boring...wrong. Make them cool and fun. I make them from scraps of paper/card stock. Here's what you need: a tag for tracing, glue, scissors,a hole punch, pretty things to decorate with (I used watercolor paints, stamps, glitter, foam tape and a sticker,) and string or ribbon for the tie of the tag.

I trace the tag onto the paper or card stock that I'm going to make my tag out of, in this case the pink paper. I then cut it out and punch the hole in it where the string is going to go later on. I then stamped my "Thinking of You" bubble stamp on a piece of white paper with archival ink and cut it out. A fabric heart sticker was placed in the lower left hand corner of the tag and glued little heart shaped glitter going up to where the thought bubble is going to be. I then used some double sided foam tape to secure the "Thinking of You" bubble down to the tag. Taking some pink water color paints and painted around the outside edged of my bubble and framed in the words. Finishing off the tag is some dark pink, light pink and white string for tying the tag to something.
You could use anything and decorate the tag in any way for any occasion. I just keep the same starting tag, my white one, for tracing. It's a nice way to add a little handmade personal touch to a gift.

Thursday, December 22, 2011
Christmas Is Coming!!!
Yes, Christmas is almost upon us and as much as I would love to delay it a least another week I can't. I did get most of my work done since the last post. I changed the calendar (I know about time, it used to be stuck at June), I changed the flag to a Christmas themed one, the tree is decorated and the house smells like cookies. I am however nowhere near done, at least it feels that way.
 The tree was one of the things I really slacked on this year. It finally got decorated and it looks pretty. The tree is an artificial one, I can't have a live one because I'm allergic :( This one is nice it has glitter and pine cones and fake snow in it. Almost all of the ornaments on it are handmade. There are some clay and some painted. The majority are plastic canvas. There are even some cookies ones, the kind that smell like cinnamon and gingerbread. I try to avoid putting a lot of breakable ornaments on the tree because I'm afraid the cats will knock them off and break them. So that's my tree...all done.
Then came the cookies. We have a tradition of baking a ton, and I do mean a ton, of cookies.
 I bake a least five different kinds of cookies a year. This year there's peanut butter kiss cookies, sugar cookies, thumb print cookies (these have different kinds of jellies in the middle), and rugelach (a cream cheese dough cookie with raisins and nuts and sugar in the middle.) I still have to cut out and decorate and bake the sugar cookies but the rest are all done and in boxes for Christmas day.
If you like peanut butter kiss cookies here's the easiest way to make them: Buy a package of peanut butter cookie mix (any kind will do, this year I used target brand.) Make the mix according to the package directions. Roll the dough into one inch balls and coat them with some sugar. Bake them in the oven at the package temperature 8-12 min or until the cookies look like they are cracking. Take them off the cookie sheet and gently push an unwrapped Hershey Kiss in the middle of the cookies. Allow them to cool until the chocolate kiss has hardened back up and enjoy. I still have wrapping to do and some more cleaning to do to get the house ready but other than that I think I'm almost done.
 The tree was one of the things I really slacked on this year. It finally got decorated and it looks pretty. The tree is an artificial one, I can't have a live one because I'm allergic :( This one is nice it has glitter and pine cones and fake snow in it. Almost all of the ornaments on it are handmade. There are some clay and some painted. The majority are plastic canvas. There are even some cookies ones, the kind that smell like cinnamon and gingerbread. I try to avoid putting a lot of breakable ornaments on the tree because I'm afraid the cats will knock them off and break them. So that's my tree...all done.
Then came the cookies. We have a tradition of baking a ton, and I do mean a ton, of cookies.

If you like peanut butter kiss cookies here's the easiest way to make them: Buy a package of peanut butter cookie mix (any kind will do, this year I used target brand.) Make the mix according to the package directions. Roll the dough into one inch balls and coat them with some sugar. Bake them in the oven at the package temperature 8-12 min or until the cookies look like they are cracking. Take them off the cookie sheet and gently push an unwrapped Hershey Kiss in the middle of the cookies. Allow them to cool until the chocolate kiss has hardened back up and enjoy. I still have wrapping to do and some more cleaning to do to get the house ready but other than that I think I'm almost done.
Sunday, June 5, 2011
Opening Day at the Farms Market!!
Today was opening day at the farmers market (CRFM - Coventry Regional Farmers Market) and what fun it was! I absolutely love the farmers market. I grew addicted to it last year as we became regulars even visiting the winter market when weather permitted us. This year it was so nice to see some of the familiar face that we have come to know again this year. There were also some new people we met there too. The people at the market are simply wonderful.
 They are so friendly and social able, as are the dogs and their owners. The kids want to pet every dog they come across, however if we did that we would never get anywhere. We have met some really nice dog owners who are kind enough to tell you what kind of dog they have and maybe a story or two about them.
Today we came across some really big dogs. I'm not sure how the owners do it but if that dog crawled into bed with you there wouldn't be much room left. I had to take a picture, the dog stands roughly waist high or higher.We also met some cute small dogs too. It's a wonderful dog friendly environment. The market only allows well behaved dogs. (Definitely a place for our dog as he is scared of his own shadow.)
 Today I can say that "I licked the Farmer's Cow." At least that's what the sticker says. I just get a giggle out of that every time I see/say it. I know, you say I liked the "Farmer's Cow" and think "what?!" It's referring to Farmer's Cow Ice Cream and boy was it good today. The perfect day for some ice cream.
Ice cream, iced coffee, raspberry crumble, strawberries, kettle corn, pizzas, tacos, pulled pork sammies, muffins, cannolis, quiches, basil that is so good you can eat it while you walk, mint, carrots, soups, pasta, breads (both stuffed and not stuffed), pancakes and sausage (which was amazing), garlic, caramel apples...do you see where I am going with this. There is just too many good things to pass up. I blame the farmers market for me having to exercise so much during the week.
This is all just from this week alone...we'll just have to see what next week brings.
If you want to see more photos from today check out my Deviant Art page. :)
 They are so friendly and social able, as are the dogs and their owners. The kids want to pet every dog they come across, however if we did that we would never get anywhere. We have met some really nice dog owners who are kind enough to tell you what kind of dog they have and maybe a story or two about them.
Today we came across some really big dogs. I'm not sure how the owners do it but if that dog crawled into bed with you there wouldn't be much room left. I had to take a picture, the dog stands roughly waist high or higher.We also met some cute small dogs too. It's a wonderful dog friendly environment. The market only allows well behaved dogs. (Definitely a place for our dog as he is scared of his own shadow.)
I got some nice pictures of various thing at the market. Lavender from Fort Hill Farms, who is one of the Farmer's Cow farmers. We learned they have a great corn maze, gem mining and a discovery barn. They also host birthday parties.
Ice cream, iced coffee, raspberry crumble, strawberries, kettle corn, pizzas, tacos, pulled pork sammies, muffins, cannolis, quiches, basil that is so good you can eat it while you walk, mint, carrots, soups, pasta, breads (both stuffed and not stuffed), pancakes and sausage (which was amazing), garlic, caramel apples...do you see where I am going with this. There is just too many good things to pass up. I blame the farmers market for me having to exercise so much during the week.
This is all just from this week alone...we'll just have to see what next week brings.
If you want to see more photos from today check out my Deviant Art page. :)
Subscribe to:
Posts (Atom)